Practical AI
About a month ago, I was interviewed by the Changelog’s Practical AI. We talked about orchestrating agents, AI APIs, MCP, and more.

Here’s the link to the episode if you want to listen in. Enjoy!
About a month ago, I was interviewed by the Changelog’s Practical AI. We talked about orchestrating agents, AI APIs, MCP, and more.
Here’s the link to the episode if you want to listen in. Enjoy!
I started a YouTube channel.
I record how I use coding assistants - mostly Cursor - in my day to day programming work.
Not scripted. Not rehearsed. I just record what I do, narrate it as I do it, and then edit for brevity. Most videos are bite sized, about 3 minutes long on 1x.
Here’s the latest:

Enjoy!
Modern computing has gone a long way. Elastic architectures have become commodities. With platforms like AWS and all its serverless offerings, you can build very reliable and very scalable systems. We learned to push static content very close to the end users thanks to the proliferation of CDNs. We then learned to run compute at the edge as well. One thing we still can’t really do effectively is push data to the edge.
What if I told you that you could use DNS? I didn’t come up with the idea. I’ve read about it here some time ago and when I had a problem that sounded like - “how do I get my data closer to the edge” - I remembered that blog post and I decided to try and do it.
An important caveat first. The problem I was solving is not a typical OLTP data problem. You are very unlikely to actually be able to replace a database with DNS using the approach I will present here. You can, however, deliver a fairly stable (and fairly small) dataset to the edge ang have low single to double digit milliseconds response time reading the data from anywhere in the world.
One of the services that we built as part of the ecosystem that powers EPAM Anywhere exposes various reference data using REST APIs. It’s a story for another day, but we have a large data platform underpinning a lot of different applications. You can connect to the firehose of data by listening to the individual Kafka topics that interest you. If you need a simple search-as-you-type access though, we have a simple fast reliable and elastic REST API for you. Think of it as kafka -> elastic -> lambda -> edge cache -> (You).
Some of these APIs are public. The data they expose is not confidential and is needed by various apps in our ecosystem. Things like our skill taxonomy and the world’s database of geographical locations like countries and cities. Access to all APIs is auth-protected. All privileged APIs require that you come with a valid JWT token from our SSO IDP. Public APIs do a simple api key authentication similar to that of Google APIs. All keys are CORS-enabled for the specific domains that you register for your app. It’s a soft protection plus it allows us to track the usage by client.
We aggressively cache API responses that don’t work with volatile data and would like to guarantee sub-half-second response time on “cold” queries and double digit ms when you access what’s been cached. All our APIs are fronted with CloudFront so we cache at the edge. And here goes the problem.
How can we check the API key efficiently at the edge before we look up the cached response?:

First, let’s talk about caching of your API responses. You have a number of options and I will rate them from more difficult/custom to more easy/out-of-the-box.
I really like the last option and that’s how we cache most of the time. It does create an interesting problem though for APIs that require authentication.
Take a look at the diagram above. When you make a GET HTTP API request and I already have a response cached for you, the request won’t ever go past #1. CloudFront allows you to run compute in response to certain events. Here is a very good summary if you are new to the concept. Every request, no matter if it’s cached or not and if a cached response is available, will trigger viewer-request function. After that, if you have the cached response, CloudFront will turn around, call viewer-response if you have one configured, and never talk to the origin. The problem is:
How do we validate that API access was authorized?
The only option we have if we chose to use CloudFront as a cache provider and require that API requests be authenticated is to run auth in the viewer-request function. This function will run in the AWS region closest to the user. This is how lambda@edge works. You can get closer and run in actual edge locations with CloudFront Functions but these awesome compute units can actually do very little. The region closest to the user is close enough, I think, but we still have a problem:
How do we ensure that key validation is as fast as possible?
We manage all API keys and all metadata about them - what APIs a key has access to, its CORS configuration, etc. - in a DynamoDB table. The table is in one region. The lambda@edge may run in the same region or may run on the other side of the world. This roundtrip can add several hundreds of milliseconds latency just to check if a key is valid. And then if we have nothing in the cache for the authenticated request, we will do another round trip to get the payload.
And that’s how I thought to try Route 53 as a delivery mechanism of the API key metadata.
At a glance, the architecture looks like this:
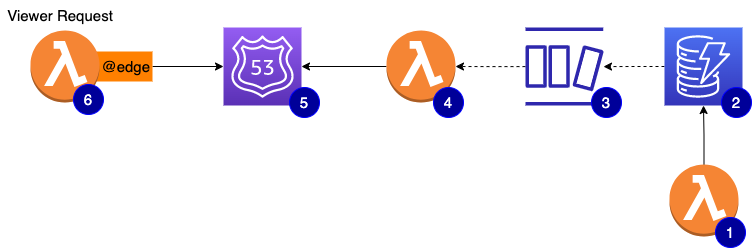
TXT record per keyviewer-request can now dig DNS TXT record to quickly check if the API key is valid and has access to the requested APISay you have your API on api.yourdomain.com and you have an API key for the said API - dfe1d217-21ce-4fc3-b6b1-c12b6a4740dc. Take some salt and some MD5 and your key becomes AB7F79C51610E78C7B1AD9EB4F8409A9. Take that and create a TXT record of AB7F79C51610E78C7B1AD9EB4F8409A9.api.yourdomain.com with the string value of serialized JSON with the key metadata. You can salt + md5 that as well just in case. I know that MD5 is a poor choice for passwords and the like (more here) but we are not talking strong cryptographic security here. Plus, even if you know the api.yourdomain.com, you can’t really query all its TXT records to go and brute-force-decode the actual API keys out of them. You can only dig a particular fully qualified DNS record.
And now, having built the replication of the key metadata to DNS, we can inspect a given API key in runtime using a simple DNS dig. The process is basically a reverse of replicating the key.
You do:
1 | $ curl -H 'x-api-key: dfe1d217-21ce-4fc3-b6b1-c12b6a4740dc' https://api.yourdomain.com/myapi/data |
The viewer-request function takes the x-api-key, applies the known salt with MD5, does the DNS dig for AB7F79C51610E78C7B1AD9EB4F8409A9.api.yourdomain.com and knows if your key is valid and what APIs it has access to.
Here’s how it looks in Typescript:
1 | import * as dns from 'dns'; |
One important limit that I need to tell you about is 10,000 records in a hosted zone for Route 53. You can add more, but additional charges will apply. You can read more here. Like I said - a fairly stable and a fairly small dataset :)
Till next time!
It’s been a while since I published anything. More than three years! A lot of things happened since then. The most relevant to mention in the beginning of this post is that I have been super busy building a lot of cool tech with a very talented team here at EPAM Anywhere. We are doing full-stack Typescript with next.js and native AWS serverless services and can’t get enough of it. This experience has been challenging me to learn new things every day and I have a lot to share!
Today I want to show you one particular technique that I found super useful when I need to safely use aws-sdk batch APIs and ensure delivery.
When you work with AWS, you will certainly use aws-sdk and APIs of different services. Need to send a message to an SQS queue? That’s an HTTP API call and you will use sdk. Need to update a document in DynamoDB? The same. Need to push a message to the Firehose? The same. Many of these APIs have their batch equivalents:
sendMessage() has sendMessageBatch()putItem() and deleteItem() have batchWriteItem()putRecord() has putRecordBatch()These batch APIs will throw if something fundamental is wrong. Say your auth is not good or you don’t have enough permissions or you don’t have the connectivity to the service. If the sdk connected successfully to the service but failed to perform some or all of the operations in your batch, the operation won’t throw. It will return an object that tells you which operations succeeded and which ones failed. The most likely reason to get partial failures is due to throttling. All of these APIs have soft and hard limits and sooner or later you will attempt to do more than AWS feels comfortable letting you get away with.
We learned it the hard way. It’s all documented, obviously, but things like this one are only obvious in hindsight. Let me show you a neat technique to batch safely but first, some background.
I always liked recursion. When you need to scroll through something that paginates, you can employ while loops or you can recursively repeat and accumulate results as you go. The recursion always felt much cleaner to me but it comes with a gotcha - no stack is infinite. Consider the following simple example:
1 | let iteration = 0; |
This snippet won’t print 100000. When I run it with node sample.js, I get 15707 printed in the console. Your mileage may vary but you know you can reach the deep end and go no further. The error that I am not reporting is Maximum call stack size exceeded.
What if op() was performing a network operation? Let’s simulate it and convert op() to an async op():
1 | let iteration = 0; |
It prints 100000 and we do not exhaust the stack. Let’s understand why and we will be well on our way to leveraging this technique in real world scenarios.
The trick is in how promises (and async functions that return them) use event loop to schedule continuations. I highly recommend this article to get a deeper insight into how it all works. And here’s specifically about promises.
Basically, Promises use micro tasks just like process.nextTick() does and since the callback runs via the event loop, the stack frame is short lived and every recursive invocation has its own.
Let me do the same but this time I will be more explicit:
1 | let iteration = 0; |
It also prints 100000 but here you can see how I “delay” promise resolution via the callback scheduled on the event loop. It adds one more ingredient that I need to explain.
I am using a trick of promise nesting when I do resolve(op()). When a promise A resolves with a promise B, the result of A is the resolved value of B. Since my op() keeps recursing onto itself, the last promise’s resolved value will be the value returned by the first call to the op().
The last thing that I want to illustrate before I show you how I use this technique with aws-sdk APIs is a recursion with a backoff strategy. Take a look:
1 | const { performance } = require("perf_hooks"); |
It prints a value somewhere around 50. The code goes through 10 executions of op() and delays each next run by iteration milliseconds. So +1, then +2, then +3, up to +9 for the last run. We stop when ++iteration is equal to 10 so we only run through 9 via setTimeout(). The sum of the arithmetic progression from 1 to 9 with a step of 1 is 45 but op() doesn’t run exactly at the interval we ask for plus performance.now() isn’t exactly 0ms so let’s call the difference an overhead.
We are now ready to put it all together and employ async recursion with backoff technique with the batch APIs to ensure delivery.
First, the backoff strategies:
1 | export type BackoffStrategy = (retryCount: number) => number; |
1 | interface SQSBatchDeliveryOptions { |
And then somewhere else in the code:
1 | async dispatch(events: Message[]): Promise<void> { |
1 | interface DynamoBatchDeliveryOptions { |
I have to say that we are not using this technique in our request/response APIs. We are pretty serious about building fast and pleasant experiences and so we target sub-half-second for user facing APIs. We use this technique anywhere else though - async step functions, batch operations, code that is responding to external events.
That’s it for today. I hope you found it useful. More to come soon!
Lambda@Edge allows you to run lambda functions in response to CloudFront events. In order to use a lambda function with CloudFront, you need to make sure that your function can assume
edgelambdaidentity. I want to show you an easy way to do it with serverless.
As of right now, serverless framework has no native support for lambda@edge. There is a plugin though that allows you to associate your lambda functions with a CloudFront distribution’s behavior.
The plugin works great if you deploy and control both your lambda functions and its associations with the CloudFront distributions. You might, however, be deploying a global function that is to be used by different teams on different distributions. Here’s a good example - a function that supports redirecting / to /index.html deeper in the URL hierarchy than the site root.
Serverless allows you to define additional IAM role statements in iamRoleStatements block but doesn’t seem to have a shortcut for the iamRoleLambdaExecution. You can certainly configure your own custom IAM::Role but that’s a pretty involved excercise if all you want to achieve is this:

If you don’t define your own IAM::Role, serverless will create one for you. The easiest way to see how it looks is to run sls package, look inside your .serverless folder, and inspect the CloudFormation JSON that will orchestrate your deployment. Look for IamRoleLambdaExecution in the Resources group.
Serverless carries a template that it uses as a starting point to build the role definition. The good news is that serverless merges it into the list of other resources that you might have defined in your serverless.yml. Take a look at the code if you want to see how it does it.
The name of the roles seems to always default to IamRoleLambdaExecution (here and here). Knowing how lodash’s merge works, all we need to do now is to give our resources definition a little boost.
In my serverless.yml:
1 | Resources: |
And that’s it. Serverless will merge its template over this structure and will keep the edgelambda principal in there. Enjoy!
Recently I found myself integrating OAuth 2 into a React/node.js app. The web is full of blog posts and questions answered on how to do it, but I still had to scratch my head a few times to get everything right. This post is a simple step by step recipe on how to do it with Passport.
I am using express so first things first:
1 | const express = require('express'); |
If you are using sessions and plan on using passport with sessions, make sure that session middleware goes first:
1 | const session = require('express-session'); |
Now we can wire in passport:
1 | const passport = require('passport'); |
This wasn’t apparent to me from the beginning and from the simple examples that I looked at, but:
passport is designed to only facilitate the authentication process. In other words, the only route that should have passport middleware on it is the
/loginroute where you would send your unauthenticated users to
1 | app.get('/login', passport.authenticate('oauth2', { |
Actually, you should also add the passport middleware to your callback route or just make /login your OAuth callback. That’s what I did. The OAuth strategy looks at ?code= in the URL to decide whether to initiate the authentication sequence or process the callback:
1 | OAuth2Strategy.prototype.authenticate = function(req, options) { |
To protect your routes and ensure authenticated access, you can use something like connect-ensure-login. Passport itself can’t help you with that:
1 | const { ensureLoggedIn } = require('connect-ensure-login'); |
To be able to do passport.authenticate('oauth2', {...}) as I showed in step 4, you should set up passport with the OAuth 2 strategy first:
1 | const OAuth2Strategy = require('passport-oauth2'); |
In order not to run the authentication sequence on every request, you would typically store the authenticated user ID in the session and then trust it for as long as the session is active. You need to implement serializeUser and deserializeUser to do it. Passport doesn’t do it automatically:
1 | passport.serializeUser((user, done) => { |
OAuth 2 can send back access_token and it can also send the id_token. The latter is always a JWT token and the former is typically an opaque string.
Sometimes all you need is the access_token that you pass on to the back-end APIs. I, however, needed to authenticate the user and match the user’s identity with the application’s user record.
Two options:
/userinfo endpoint with the access_token to retrieve the profile from your identity providerid_token and get profile attributes from there. To receive the id_token in the callback, you need to add scope=openid to your authorization request. If you need user’s email or additional attributes like name, for example, you will need to ask for more scopes (scope=openid email or scope=openid profile).OAuth 2.0 is not an authentication protocol, apparently. Read the User Authentication article on oauth.net if you want to learn more. The
id_token, claims, scopes, and/userinfoare all part of OpenID Connect.
When we set up the OAuth 2 strategy in step 6, we had to supply a tokenToProfile callback. If you read the documentation, you will see that it has the following signature:
1 | function (accessToken, refreshToken, profile, cb) { |
Don’t be surprised to always receive an empty object in profile:
OAuth 2 strategy for passport does not implement retrieval of the user profile
Here’s how it looks in the library:
1 | OAuth2Strategy.prototype.userProfile = function(accessToken, done) { |
You can either override it and use /userinfo endpoint or you can rely on id_token. Here’s how you would do the former:
1 | const strategy = new OAuth2Strategy({ ... }); |
The latter requires you to not only ask for the id_token from your identity provider using scope=openid, but to also have it exposed to you by the OAuth 2 strategy in passport. To do so, you need to set passReqToCallback to true when you instantiate the strategy (we did in step 6), and then you can use a different signatue for your callback:
1 | const jwt = require('jsonwebtoken'); |
The easiest and the most effective way to logout a user is to destroy the session:
1 | router.get('/logout', function (req, res) { |
If you have gotten this far, I have a bonus step for you. I found it very helpful to be able to spoof authentication in local environment for development and testing.
First, the environment variable in my .env file to signal that the auth should be bypassed and to tell the app what user to run on behalf of:
1 | AUTH_LOCAL_SPOOF_USER={"user_id": 2, "employeeID": "pavel@dontemailme.com", "role_id": 0} |
And then a bypass strategy:
1 | const strategy = new OAuth2Strategy({ ... }); |
And that’s it! Enjoy!
Last night I finally got a chance to publish the remaining setup scripts for my E-Commerce Chatbot. A few days ago, I added the script to load up products and variants into Azure Search and now also the catalog and historical transactions for Azure Recommendations. I basically had to script what I originally did as a one-off with
curl.
Training the recommender model takes time and when you create a new recommendation build, it won’t be ready right away. I wanted my script to wait and keep polling the API until the training has finished. The whole script is basically a serious of asynchronous HTTP requests so I wired it all up as a chain of promises:
1 | sdk.model.list() |
You can see the full listing here.
Here’s how I implemented the wait-and-see:
1 | // ... |
It’s basically a recursive promise. The function in the main then() will return a promise that will always resolve unless there’s an error, but the key is in what it will resolve with and how it runs. The function that the returned promise is wrapped around schedules itself via setTimeout() and exits the stack frame. Then, when the response is received, it will either resolve and signal that the training has complete, or it will resolve with another promise that will recursively repeat this process again. That another promise will basically insert itself into the main then chain and it will keep waiting until it resolves. Vicious circle.
It worked nicely and I even factored out the repeater so that my code looked like this:
1 | // ... |
I really thought that I was very cleaver but then I decided to rewrite with
async/awaitand run with the latest node that now natively supports it
Here’s what this code became:
1 | let trained = false; |
Here. Compare both versions: Original vs. Async/Await
It’s not even funny! The code is so boring now, boring and simple. Just like it should be. No need to be clever and I bet I will know exactly what it’s doing and why when I look at it a year later.
I have officially converted.
Cheers!
A few weeks ago I found myself building a simple app, a prototype actually. It has a nice interface to request that a certain job (or multiple) be executed in the background. It also provides real-time updates about those jobs. Nothing that you can’t do with JavaScript. I quickly settled on a node.js back-end with a React front-end and a socket.io channel in between.
This post is about how I set up my solution and my dev environment to nicely bundle my client and my server together to make everything work smoothly locally (including the compound end-to-end debugging) as well as to be ready for production deployment to heroku.
The overall solution looks like this:
1 | solution/ |
The first three things that I did after I created the solution folder were:
1 | & cd solution && npm init |
In development, I would like my client to start up using react-scripts with webpack server on :3000 with hot reloading and other awesomeness. In production, however, my server will be serving up all front-end assets. And it will run on a different port locally when executed side by side with the webpack server. From server/app.js:
1 | const app = express(); |
First, I installed concurrently in the root of the solution so that I could run both server and client with one command:
1 | $ npm install concurrently --save-dev |
Then, I added the following command to the solution level package.json:
1 | "scripts": { |
Now when I do npm run debug in the solution root, I get two processes spun up - one runs the server/app.js on :3001 and the other one runs the client on :3000. I also run server in debug mode and this will come handy when we get to setting up local debugging.
By the way, I used debug and not start command because I need npm start to be the way heroku launches this setup in production where server handles it all:
1 | "scripts": { |
I also need heroku to install all dependencies and build the front-end every time I push new version up. That’s one more npm command in the solution level package.json:
1 | "scripts": { |
The client expects socket.io to be accessible on the /api endpoint from the same server. From the App.js:
1 | import io from 'socket.io-client'; |
Easy in production setting where there is only one server. This is where proxy comes in to aid the development setup. We need to tell the webpack dev server to proxy everything it can’t handle to the server over at :3001. Need to add one little line to the client/pacakge.json:
1 | { |
Last but not least, I would really like to be able to debug both client and server in one place. Visual Studio Code supports compound debugging since late last year. Here’s my launch configuration:
1 | { |
You will need the Debugger for Chrome extension. Now you can npm run debug and then F5 to attach to both processes.
Nirvana.
Anthony Accomazzo’s post - Using create-react-app with a server - made it very easy for me to set it all up. I am very happy to share it a little further with a thin layer of heroku and VS code debugging.
Enjoy!
I have blogged about sentiment detection and relaxed prompts before. I have recently put the two together and came up with a good recipe for handling prompts. Let me show you why I needed it and how I dealt with it.
The bot framework can throw you a curve ball if you’re not careful selecting your prompts choices:
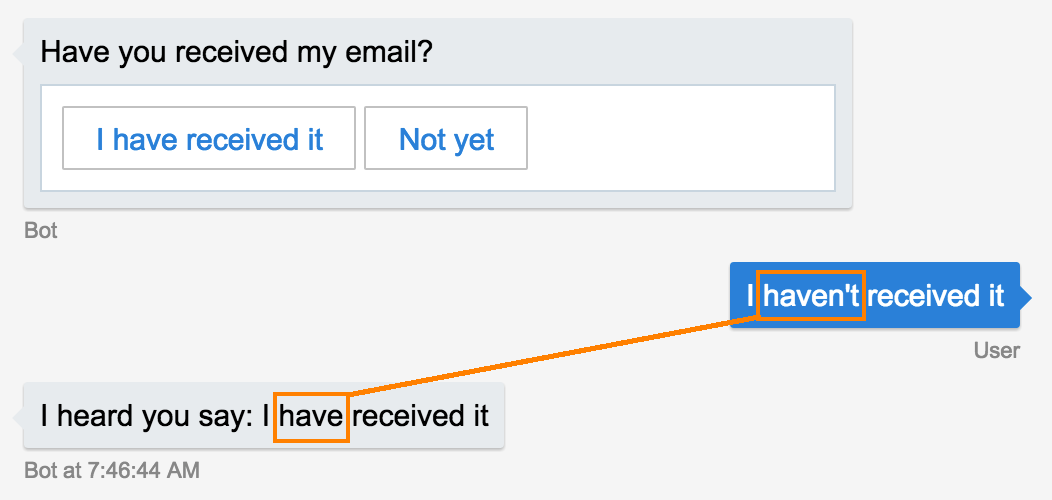
It is actually trying to be smart. The bot is not sure but believes with 61% confidence that the user said
I have received it. And a clear opposite to the positive option -I have not received it- would match with even stronger 83% score. WAT.
For simple yes/no choices, the bot will try a regex:
1 | EntityRecognizer.yesExp = /^(1|y|yes|yep|sure|ok|true)(\W|$)/i; |
It has a few tricks to help more complicated cases:
1 | // [excerpt from EntityRecognizer.ts] |
61% is the result of computing 'Ireceivedit'.length/'I have received it'.length. The alternative I have not received it gives us an even better score as more tokens find a match.
Tip #1: Spend some time thinking about how you formulate your choices not to get trapped by the fuzzy match logic.
Since I built my first chatbot last year, I often find myself consulting EPAM‘s clients on the technology and the approach, and go as far as helping their teams get off the ground building one.
My go-to technique to bootstrap the conversation is to ask a client to document their imaginary conversation with the bot as if it existed. I can get a lot from this simple exercise. I can recommend a proper delivery channel. It will help decide if they need a custom built NLU service or can get by with LUIS or API.ai. I will also use their dialogue to educate them about what’s easy with the commoditized AI and what’s not. Asking the bot to do three things at once, for example, may sound very natural, but will likely be a lot harder to handle.
I also try to disambiguate the prompts:
Bot >> Did you receive my email? [yes/no]
User >> no
Bot >> Did you check your spam folder?
I would instead have the bot say:
Bot >> Please check your spam folder. Did you find the email there? [yes/no]
This way the bot has no problem understanding what the positive yes and the negative no mean.
Tip #2. If the bot needs to ask a
yes/noquestion, make it ayes/noquestion. Unless, of course, you want to spend time building smarter brains for your bot
Another example:
[IT Support, locked account scenario]

Bot >> You can either wait 15 minutes and try again
Bot >> or you can reset your password to unlock your account now
Bot >> What would you like to do?
You can give the user two mutually exclusive options and lock the prompt, but if you are like me and prefer to keep the prompts more open and relaxed, you might want to change the bot’s prompt to:
Bot >> You can either wait 15 minutes and try again
Bot >> or you can reset your password to unlock your account now
Bot >> Would you like to reset your password? [yes/no]
Last example:
[end of the dialog]

Bot >> Great! Anything else I can help you with?
It’s a very natural prompt, but I suggest you don’t let your bot ask it this way. Not unless you’re ready to handle an arbitrary reply. Instead, have the bot say something like:
Bot >> Great! I am glad I was able to help
Tip 3. Don’t solicit feedback from your user that you are not equipped to handle.
If you follow the first three tips, you are very likely to have more yes/no prompts in your dialogs than other binary questions. EntityRecognizer does a good job with a simple regex but you may want to dial it up a notch with sentiment detection.
The idea is simple. Prompt the user with a yes/no question but do it in a relaxed manner. Let the user answer with whatever they feel like if they don’t use the buttons. Then, let the Bot Framework try to understand if it was a yes or a no. If not successful, turn to sentiment detection and treat a positive expression as a yes and a negative as a no. And finally, if sentiment detection comes back inconclusive, re-prompt the user and this time lock the choices to yes/no.
Here’s a reusable macro:
1 | // [module sentiment.js] |
And now we can easily use it in our dialogs thanks to the spread syntax:
1 | const sentiment = require('./sentiment'); |
I am using this technique in my e-commerce chatbot example and here’s a link to the full sentiment.js
Tip #4: Make your prompts handling smarter with sentiment detection but be ready to lock the user into a
yes/nodecision if sentiment detection comes back inconclusive.
Sentiment detection is not without traps either:
1 | > const sentiment = require('./app/sentiment'); |
That was a very positive no, apparently :)
Cheers!
A bot that one of our teams is working on has the following functional requirement:
Dialog reaches a point where chatbot is no longer able to help. At this point, a transcript of the conversation will be sent to a mailbox.
Capturing a transcript requires that we keep track of all messages that are sent and received by the bot. The framework only keeps track of the conversations’ current dialogs stack. I already showed you guys how to build a simple history engine and give the bot the breadcrumbs of the entire conversation. Let’s see how we can record a transcript.
UniversalBot extends the node.js’s EventEmitter and will produce a number of events as it processes incoming and outgoing messages. We can subscribe to send and receive, for example:
1 | bot.on('send', function(event) { |
There’s a little caveat that I want to bring up before I show you how to get to the conversation’s session in the event handler.
sendandreceiveare emitted before the bot runs through the middleware stack. In general, an exception in one of the middleware components should not break the chain, but if you want to only capture messages that were actually dispatched to the user, you would subscribe tooutgoingthat files after the middleware chain.
Let’s now add the journaling logic.
First attempt:
1 | const transcript = function (session, direction, message) { |
session.save()It’s very important to understand how the bot handles the session data. The default mechanism is MemoryBotStorage that stores everything in memory and works synchronously. Your bot would default to it if you used the ConsoleConnector. You are a lot more likely to use the ChatConnector that comes with external persistence implementation. It will be reading and saving data asynchronously. Please also note that everything you put on session (e.g. session.userData) is JSON serialized for storage. Don’t try keeping callback functions around on the session.dialogData, for example.
The next very important thing to understand is that session.save() is asynchronous as well. It’s actually worse. It’s delayed via setTimeout(). The delay is configurable via autoBatchDelay and defaults to 250 milliseconds. The bot will auto-save all session data as part of sending the messages out to the user which it does in batches. The delay is built into the batching logic to ensure the bot doesn’t spend extra I/O cycles when it feels like sending multiple messages. Calling session.save() just triggers the next batch.
You can remove the delay:
1 | const bot = new builder.UniversalBot(connector, { |
The batching will still be asynchronous though. You can also bypass the batching altogether and instead of session.save() call session.options.onSave() directly, but you can’t work around the asynchronous nature of how the data is saved by the ChatConnector.
bot.loadSession()This method is not part of the documented public API and there’s probably a good reason for it. The bot framework doesn’t keep the sessions around. Session objects are created on demand and discarded by the GC when the request/response cycle is over. In order to create a new session object, the bot needs to load and deserialize the session data which as you just have learned happens asynchronously.
If you run the code I showed you, you will only see the outgoing messages on the transcript.
The
incomingmessages are swallowed and overwritten by the asynchronous and delayed processing.
There’s one event in the incoming message processing pipeline that is different from all others - routing. An event handler for routing is given a session object that the bot framework has just created to pass on to the selected dialog. We can transcript without having to load our own session instance:
1 | bot.on('routing', function (session) { |
The routing event is the last in the chain of receive -> (middleware) -> incoming -> routing.
There is no equivalent to
routingon the way out though. No event insend -> (middleware) -> outgoingchain is given thesessionobject. There is a good reason why. Sending the messages out happens after the bot finished saving the session data.
While it’s sad that we don’t have an equivalent of routing in the outbound pipeline, knowing that session data is complete prior to bot framework dispatching the messages out makes me feel good about re-saving it. We don’t risk overwriting anything important like call stack or other session data.
Second attempt:
1 | const transcript = function (session, direction, message) { |
This time it works as expected but is not free of side effects. The bot.loadSession() on the way out is still asynchronous and prone to interleaving. If your bot starts sending multiple messages and especially doing so asynchronously in response to receiving external data via a Promise, for example, you may find yourself not capturing all of it.
Another way of intercepting incoming and outgoing messages is to inject a custom middleware. The middleware is called in between receive and incoming, and also in between send and outgoing:
1 | bot.use({ |
next() Middleware that you inject via bot.use() form a stack that is processed synchronously and in order. The bot framework does it via a recursive function that self-invokes. Every invocation notifies the next middleware in the chain and will eventually call the main processing callback. This is a nice way to keep running down the list even when one errors out as it will self-invoke in a catch block. I suggest that you guys take a closer look at UniversalBot.prototype.eventMiddleware if you’re interested. So if we don’t call next(), the chain will not continue and the bot will never receive the message.
We can use this feature to our advantage. If we chain next() onto the direct call to session.options.onSave(), we can ensure that the chain continues after the successful journaling of the transcript. No chance to have them all interleave and overwrite one another, though it probably takes longer before it gets to the user:
1 | const transcript = function (session, direction, message, next) { |
You can also combine the two techniques and use routing event for incoming messages and only use send middleware to capture the outgoing traffic. Just make sure that you don’t do session.save() for the incoming. Here’s a gist.
I don’t know how stable is
session.options.onSave()andbot.loadSession(). Neither one is part of the official public API so use at your own risk.
You can also roll your own transcript service and safely call it asynchronously from the send and receive event handlers. What I like about using session.privateConversationData is that I need no custom infrastructure and can easily discard the transcripts if I don’t use them. The bot framework will take care of it for me.
It would be nice though if bot framework gave me a routing-like event for the outbound pipeline that would fire before saving of the data. This way I would be able to nicely record the transcript without disrupting the flow of things, and wouldn’t risk relying on internal implementation detail that can easily go away in the next version.