DNS as your Edge database

Modern computing has gone a long way. Elastic architectures have become commodities. With platforms like AWS and all its serverless offerings, you can build very reliable and very scalable systems. We learned to push static content very close to the end users thanks to the proliferation of CDNs. We then learned to run compute at the edge as well. One thing we still can’t really do effectively is push data to the edge.

What if I told you that you could use DNS? I didn’t come up with the idea. I’ve read about it here some time ago and when I had a problem that sounded like - “how do I get my data closer to the edge” - I remembered that blog post and I decided to try and do it.

An important caveat first. The problem I was solving is not a typical OLTP data problem. You are very unlikely to actually be able to replace a database with DNS using the approach I will present here. You can, however, deliver a fairly stable (and fairly small) dataset to the edge ang have low single to double digit milliseconds response time reading the data from anywhere in the world.

The Problem

One of the services that we built as part of the ecosystem that powers EPAM Anywhere exposes various reference data using REST APIs. It’s a story for another day, but we have a large data platform underpinning a lot of different applications. You can connect to the firehose of data by listening to the individual Kafka topics that interest you. If you need a simple search-as-you-type access though, we have a simple fast reliable and elastic REST API for you. Think of it as kafka -> elastic -> lambda -> edge cache -> (You).

Some of these APIs are public. The data they expose is not confidential and is needed by various apps in our ecosystem. Things like our skill taxonomy and the world’s database of geographical locations like countries and cities. Access to all APIs is auth-protected. All privileged APIs require that you come with a valid JWT token from our SSO IDP. Public APIs do a simple api key authentication similar to that of Google APIs. All keys are CORS-enabled for the specific domains that you register for your app. It’s a soft protection plus it allows us to track the usage by client.

We aggressively cache API responses that don’t work with volatile data and would like to guarantee sub-half-second response time on “cold” queries and double digit ms when you access what’s been cached. All our APIs are fronted with CloudFront so we cache at the edge. And here goes the problem.

How can we check the API key efficiently at the edge before we look up the cached response?:

Options

Infrastructure

First, let’s talk about caching of your API responses. You have a number of options and I will rate them from more difficult/custom to more easy/out-of-the-box.

  • You can build the cache yourself. Have every request go all the way through to your API function (#4 on the diagram) and have it pull the response from the cache.
  • You can have the cache done at the API Gateway level. That would be #3 on the diagram. AWS has two API Gateway products - REST API and HTTP API. We are using HTTP API for everything that doesn’t need special networking setup. HTTP API doesn’t have a cache built-in. REST API does but it really is a provisioned instance. You can read more here.
  • You can cache at the edge using CloudFront cache behavior. This cache is the simplest to set up and would be the closest to your users no matter where they are in the world.

I really like the last option and that’s how we cache most of the time. It does create an interesting problem though for APIs that require authentication.

Take a look at the diagram above. When you make a GET HTTP API request and I already have a response cached for you, the request won’t ever go past #1. CloudFront allows you to run compute in response to certain events. Here is a very good summary if you are new to the concept. Every request, no matter if it’s cached or not and if a cached response is available, will trigger viewer-request function. After that, if you have the cached response, CloudFront will turn around, call viewer-response if you have one configured, and never talk to the origin. The problem is:

How do we validate that API access was authorized?

The only option we have if we chose to use CloudFront as a cache provider and require that API requests be authenticated is to run auth in the viewer-request function. This function will run in the AWS region closest to the user. This is how lambda@edge works. You can get closer and run in actual edge locations with CloudFront Functions but these awesome compute units can actually do very little. The region closest to the user is close enough, I think, but we still have a problem:

How do we ensure that key validation is as fast as possible?

We manage all API keys and all metadata about them - what APIs a key has access to, its CORS configuration, etc. - in a DynamoDB table. The table is in one region. The lambda@edge may run in the same region or may run on the other side of the world. This roundtrip can add several hundreds of milliseconds latency just to check if a key is valid. And then if we have nothing in the cache for the authenticated request, we will do another round trip to get the payload.

And that’s how I thought to try Route 53 as a delivery mechanism of the API key metadata.

Architecture

At a glance, the architecture looks like this:

Architecture

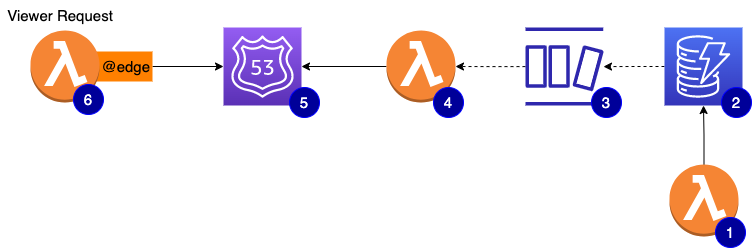
  • #1 is a lambda function that is basically a CRUD API used by our developer portal to provision and manage your API access
  • #2 is the main DynamoDB table. The source of record for all API keys metadata
  • #3 is the stream enabled on the DynamoDB table to stream out any changes
  • #4 is a lambda function subscribed to the stream. Depending on the event captured, it will create, update, or delete a DNS replica using one TXT record per key
  • #5 the viewer-request can now dig DNS TXT record to quickly check if the API key is valid and has access to the requested API

Say you have your API on api.yourdomain.com and you have an API key for the said API - dfe1d217-21ce-4fc3-b6b1-c12b6a4740dc. Take some salt and some MD5 and your key becomes AB7F79C51610E78C7B1AD9EB4F8409A9. Take that and create a TXT record of AB7F79C51610E78C7B1AD9EB4F8409A9.api.yourdomain.com with the string value of serialized JSON with the key metadata. You can salt + md5 that as well just in case. I know that MD5 is a poor choice for passwords and the like (more here) but we are not talking strong cryptographic security here. Plus, even if you know the api.yourdomain.com, you can’t really query all its TXT records to go and brute-force-decode the actual API keys out of them. You can only dig a particular fully qualified DNS record.

In Action

And now, having built the replication of the key metadata to DNS, we can inspect a given API key in runtime using a simple DNS dig. The process is basically a reverse of replicating the key.

You do:

1
$ curl -H 'x-api-key: dfe1d217-21ce-4fc3-b6b1-c12b6a4740dc' https://api.yourdomain.com/myapi/data

The viewer-request function takes the x-api-key, applies the known salt with MD5, does the DNS dig for AB7F79C51610E78C7B1AD9EB4F8409A9.api.yourdomain.com and knows if your key is valid and what APIs it has access to.

Here’s how it looks in Typescript:

1
2
3
4
5
6
7
8
9
10
11
12
13
14
15
16
17
18
19
20
import * as dns from 'dns';
import { promisify } from 'util';

export const readKey = async (host: string, apiKey: string): Promise<ApiKey | undefined> => {
const resolver = new dns.Resolver({ timeout: 50 });
const resolveTxt = promisify(resolver.resolveTxt);
try {
const txt = await resolveTxt.call(resolver, `${apiKey}.${host}`);

const key = txt
.map((record) => JSON.parse(record.join('') || '{}') as Record<string, string>)
.reduce((result, record) => ({ ...result, ...record }), {} as ApiKey);

return key;
} catch (error) {
if (typeof error === 'object' && (error as NodeJS.ErrnoException).code === 'ENOTFOUND') {
// No DNS record for the key
}
}
};

Limitations

One important limit that I need to tell you about is 10,000 records in a hosted zone for Route 53. You can add more, but additional charges will apply. You can read more here. Like I said - a fairly stable and a fairly small dataset :)


Till next time!

Async Recursion with backoff

It’s been a while since I published anything. More than three years! A lot of things happened since then. The most relevant to mention in the beginning of this post is that I have been super busy building a lot of cool tech with a very talented team here at EPAM Anywhere. We are doing full-stack Typescript with next.js and native AWS serverless services and can’t get enough of it. This experience has been challenging me to learn new things every day and I have a lot to share!

Today I want to show you one particular technique that I found super useful when I need to safely use aws-sdk batch APIs and ensure delivery.

When you work with AWS, you will certainly use aws-sdk and APIs of different services. Need to send a message to an SQS queue? That’s an HTTP API call and you will use sdk. Need to update a document in DynamoDB? The same. Need to push a message to the Firehose? The same. Many of these APIs have their batch equivalents:

These batch APIs will throw if something fundamental is wrong. Say your auth is not good or you don’t have enough permissions or you don’t have the connectivity to the service. If the sdk connected successfully to the service but failed to perform some or all of the operations in your batch, the operation won’t throw. It will return an object that tells you which operations succeeded and which ones failed. The most likely reason to get partial failures is due to throttling. All of these APIs have soft and hard limits and sooner or later you will attempt to do more than AWS feels comfortable letting you get away with.

We learned it the hard way. It’s all documented, obviously, but things like this one are only obvious in hindsight. Let me show you a neat technique to batch safely but first, some background.

Recursion

I always liked recursion. When you need to scroll through something that paginates, you can employ while loops or you can recursively repeat and accumulate results as you go. The recursion always felt much cleaner to me but it comes with a gotcha - no stack is infinite. Consider the following simple example:

1
2
3
4
5
6
7
8
9
10
11
12
13
let iteration = 0;

const op = () => {
++iteration;

return iteration === 100000 ? iteration : op();
};

try {
console.log(op());
} catch (error) {
console.error(iteration);
}

This snippet won’t print 100000. When I run it with node sample.js, I get 15707 printed in the console. Your mileage may vary but you know you can reach the deep end and go no further. The error that I am not reporting is Maximum call stack size exceeded.

Async Recursion

What if op() was performing a network operation? Let’s simulate it and convert op() to an async op():

1
2
3
4
5
6
7
8
9
let iteration = 0;

const op = async () => {
await Promise.resolve(++iteration);

return iteration === 100000 ? iteration : op();
};

op().then(console.log).catch(console.error);

It prints 100000 and we do not exhaust the stack. Let’s understand why and we will be well on our way to leveraging this technique in real world scenarios.

The trick is in how promises (and async functions that return them) use event loop to schedule continuations. I highly recommend this article to get a deeper insight into how it all works. And here’s specifically about promises.

Basically, Promises use micro tasks just like process.nextTick() does and since the callback runs via the event loop, the stack frame is short lived and every recursive invocation has its own.

Let me do the same but this time I will be more explicit:

1
2
3
4
5
6
7
8
9
10
11
let iteration = 0;

const op = () => {
++iteration;

return iteration === 100000
? iteration
: new Promise((resolve) => process.nextTick(() => resolve(op())));
};

op().then(console.log).catch(console.error);

It also prints 100000 but here you can see how I “delay” promise resolution via the callback scheduled on the event loop. It adds one more ingredient that I need to explain.

I am using a trick of promise nesting when I do resolve(op()). When a promise A resolves with a promise B, the result of A is the resolved value of B. Since my op() keeps recursing onto itself, the last promise’s resolved value will be the value returned by the first call to the op().

Async Recursion with backoff

The last thing that I want to illustrate before I show you how I use this technique with aws-sdk APIs is a recursion with a backoff strategy. Take a look:

1
2
3
4
5
6
7
8
9
10
11
12
13
14
const { performance } = require("perf_hooks");

let iteration = 0;
const start = performance.now();

const op = () => {
++iteration;;

return iteration === 10
? performance.now() - start
: new Promise((resolve) => setTimeout(() => resolve(op()), iteration));
};

op().then(console.log).catch(console.error);

It prints a value somewhere around 50. The code goes through 10 executions of op() and delays each next run by iteration milliseconds. So +1, then +2, then +3, up to +9 for the last run. We stop when ++iteration is equal to 10 so we only run through 9 via setTimeout(). The sum of the arithmetic progression from 1 to 9 with a step of 1 is 45 but op() doesn’t run exactly at the interval we ask for plus performance.now() isn’t exactly 0ms so let’s call the difference an overhead.

AWS batch APIs with retries

We are now ready to put it all together and employ async recursion with backoff technique with the batch APIs to ensure delivery.

First, the backoff strategies:

1
2
3
4
5
6
7
8
export type BackoffStrategy = (retryCount: number) => number;

export const attemptTimesOneHundredMs: BackoffStrategy = (attempt: number) =>
100 * attempt;

export const attemptSquaredTimesOneHundredMs: BackoffStrategy = (
attempt: number
) => Math.pow(attempt, 2) * 100;

SQS

1
2
3
4
5
6
7
8
9
10
11
12
13
14
15
16
17
18
19
20
21
22
23
24
25
26
27
28
29
30
31
32
33
34
35
36
37
38
39
40
41
42
43
44
45
interface SQSBatchDeliveryOptions {
readonly sqs: SQS;
readonly queueUrl: string;
readonly retries?: number;
readonly backoff?: BackoffStrategy;
}
/**
* Perform batch write to the SQS. All records that failed will be retried with a backoff.
*
* The method will throw if we failed to deliver the batch after we exhausted the allowed retries.
*
* This factory method returns a reusable function that you can use over and over again if you are sending batches to the same `queue`.
*
* **NOTE** We are not checking any limits imposed by AWS/SQS. As of the time of this writing:
* - no more than 10 messages per batch
* - a message (and a batch as a whole) cannot be larger than 256Kb. We have helpers that do S3 bypass.
* - a message in each batch can only be ASCII with a few exceptions. Base64 encoding is recommended and we have helpers that you can use
*
* @param sqs instantiated sqs client
* @param queueUrl the queue URL to work with
* @param retries how many times to retry. default is 5
* @param backoff backoff strategy that can be calculated based on the attempt number. the default is 100ms * attempt
* @returns the reusable function that you call with your batch details

*/
export const deliverBatchToSqs =
({ sqs, queueUrl, retries = 5, backoff = attemptTimesOneHundredMs }: SQSBatchDeliveryOptions) =>
(batch: SQS.SendMessageBatchRequestEntryList): Promise<void> => {
const run = async (batch: SQS.SendMessageBatchRequestEntryList, attempt: number): Promise<void> => {
if (attempt > retries) {
throw new Error(`Failed to deliver batch after ${attempt} attempts`);
}

const { Failed } = await sqs.sendMessageBatch({ QueueUrl: queueUrl, Entries: batch }).promise();

if (Failed.length > 0) {
const retry = batch.filter((entry) => Failed.find((failed) => failed.Id === entry.Id));
if (retry.length > 0) {
return new Promise((resolve) => setTimeout(() => resolve(run(retry, attempt + 1)), backoff(attempt)));
}
}
};

return run(batch, 1);
};

And then somewhere else in the code:

1
2
3
4
5
6
7
8
9
10
11
12
13
14
15
16
17
18
async dispatch(events: Message[]): Promise<void> {
const batches = batchBy10AndNoMoreThan256KbEach(events);

const deliver = deliverBatchToSqs({ sqs: this.sqs, queueUrl: this.queue, logger });

await Promise.all(
batches.map((batch) =>
deliver(
batch.map((message) => ({
Id: nanoid(),
MessageGroupId: message.groupId,
MessageDeduplicationId: message.key,
MessageBody: message.payload,
}))
)
)
);
}

DynamoDB

1
2
3
4
5
6
7
8
9
10
11
12
13
14
15
16
17
18
19
20
21
22
23
24
25
26
27
28
29
30
31
32
33
34
35
36
37
38
39
40
41
42
43
44
interface DynamoBatchDeliveryOptions {
readonly db: DocumentClient;
readonly table: string;
readonly retries?: number;
readonly backoff?: BackoffStrategy;
}

/**
* Perform batch write/delete to the DynamoDB. All records that failed will be retried up to five times with a backoff.
* The method will throw if we failed to deliver the batch after the specified number of retries. Default is 5
*
* This factory method returns a reusable function that you can use over and over again if you are sending batches to the same `table`.
*
* **NOTE** We are not checking any limits imposed by AWS/Dynamo. As of the time of this writing:
* - 25 requests per batch
* - max document size is 400Kb including attribute name lengths
* - the total size of items written cannot exceed 16Mb (400x25 is less btw)
*
* @param db instantiated document client
* @param table the name of the DynamoDB table to work with
* @param retries how many times to retry. default is 5
* @param backoff backoff strategy that can be calculated based on the attempt number. the default is 100ms * attempt
* @returns the reusable function that you call with your batch details
*/
export const deliverBatchToDynamo =
({ db, table, retries = 5, backoff = attemptTimesOneHundredMs }: DynamoBatchDeliveryOptions) =>
(batch: DocumentClient.WriteRequests): Promise<void> => {
const run = async (batch: DocumentClient.WriteRequests, attempt: number): Promise<void> => {
if (attempt > retries) {
throw new Error(`Failed to deliver batch after ${attempt} attempts`);
}

const { UnprocessedItems } = await db.batchWrite({ RequestItems: { [table]: batch } }).promise();

if (UnprocessedItems) {
const retry = UnprocessedItems[table];
if (retry?.length) {
return new Promise((resolve) => setTimeout(() => resolve(run(retry, attempt + 1)), backoff(attempt)));
}
}
};

return run(batch, 1);
};

I have to say that we are not using this technique in our request/response APIs. We are pretty serious about building fast and pleasant experiences and so we target sub-half-second for user facing APIs. We use this technique anywhere else though - async step functions, batch operations, code that is responding to external events.

That’s it for today. I hope you found it useful. More to come soon!

Lambda@Edge with serverless

Lambda@Edge allows you to run lambda functions in response to CloudFront events. In order to use a lambda function with CloudFront, you need to make sure that your function can assume edgelambda identity. I want to show you an easy way to do it with serverless.

Missing identity

As of right now, serverless framework has no native support for lambda@edge. There is a plugin though that allows you to associate your lambda functions with a CloudFront distribution’s behavior.

The plugin works great if you deploy and control both your lambda functions and its associations with the CloudFront distributions. You might, however, be deploying a global function that is to be used by different teams on different distributions. Here’s a good example - a function that supports redirecting / to /index.html deeper in the URL hierarchy than the site root.

Serverless allows you to define additional IAM role statements in iamRoleStatements block but doesn’t seem to have a shortcut for the iamRoleLambdaExecution. You can certainly configure your own custom IAM::Role but that’s a pretty involved excercise if all you want to achieve is this:

Lambda@Edge Identity in IAM

Easy way out

If you don’t define your own IAM::Role, serverless will create one for you. The easiest way to see how it looks is to run sls package, look inside your .serverless folder, and inspect the CloudFormation JSON that will orchestrate your deployment. Look for IamRoleLambdaExecution in the Resources group.

Serverless carries a template that it uses as a starting point to build the role definition. The good news is that serverless merges it into the list of other resources that you might have defined in your serverless.yml. Take a look at the code if you want to see how it does it.

The name of the roles seems to always default to IamRoleLambdaExecution (here and here). Knowing how lodash’s merge works, all we need to do now is to give our resources definition a little boost.

In my serverless.yml:

1
2
3
4
5
6
7
8
9
10
11
Resources:
IamRoleLambdaExecution:
Type: "AWS::IAM::Role"
Properties:
AssumeRolePolicyDocument:
Statement:
- Effect: Allow
Principal:
Service:
- lambda.amazonaws.com
- edgelambda.amazonaws.com

And that’s it. Serverless will merge its template over this structure and will keep the edgelambda principal in there. Enjoy!