Content Work Automation with Text Analytics API

In my last post I used Computer Vision APIs to automate image tagging. Let’s see if machine learning APIs can help us automate tedious content work like SEO keywords generation and text proof reading.

Microsoft Cognitive Services offers Text Analytics API that can extract keywords from text and can also do sentiment analysis. I will again use Sitecore, its Habitat demo site, and Powershell Extensions to automate everything though the concepts should apply to any modern CMS.

Key Phrases

It’s probably not hard to come up with a decent list of keywords for a body of text that is a web page. As the size of your site grows, however, the task becomes very tedious very quickly if performed manually. Add to that the editorial calendar with frequent updates and you now run a risk of having obsolete keywords adversely impacting your SEO. Add to that a component based approach with proper content reuse and flexibility in the hands of your content teams and it’s even harder to track what exactly each page renders on the live site. Everything that can be automated should be automated,

Getting keywords for a given text fragment from Text Analytics API is very straightforward:

1
2
3
4
5
6
7
$keywords = Invoke-WebRequest `
-Uri 'https://westus.api.cognitive.microsoft.com/text/analytics/v2.0/keyPhrases' `
-Body "{'documents': [ { 'language': 'en', 'id': '$($page.ID)', 'text': '$text' } ]}" `
-ContentType "application/json" `
-Headers @{'Ocp-Apim-Subscription-Key' = '<use-your-own-key>'} `
-Method 'Post' `
-UseBasicParsing | ConvertFrom-Json

Here’s how I am going to aggregate the content for a given page:

1
2
3
4
5
6
7
8
9
10
11
12
function GetContent($item, $layout = $False)
{
# TBD
}

$content = GetContent $page $True `
| Where { $_ -match '\D+' } `
| %{ $_ -replace '\.$', ''} `
| Sort-Object `
| Get-Unique

$text = [String]::Join('. ', $content)

Basically, I will get various content fragments concatenated together into one big blob of text.

Aggregating Content

The GetContent function will get all content fields off of the item and then will recursively process all the datasources that the layout references. It’s actually smart enough to also resolve links to other items like you would find in the content fields on the carousel panels, for example. It will go as deep as needed, will strip out rich text markup, will skip system fields, and will even handle cyclic references.

Take a look on github if you’re interested, I enjoyed writing this one.

Keywords That Matter

For my experiment I decided to limit the key phrases returned by the API to only those that have words capitalized. I figured it’s a good indication of a header or a subtitle plus it helps spot ALL CAPS text as you will see in a minute:

1
2
3
$keywords.documents[0].keyPhrases `
| Where { $_ -cmatch '^([A-Z]\w+\s?)*$' } `
| %{ Write-Host $_ }

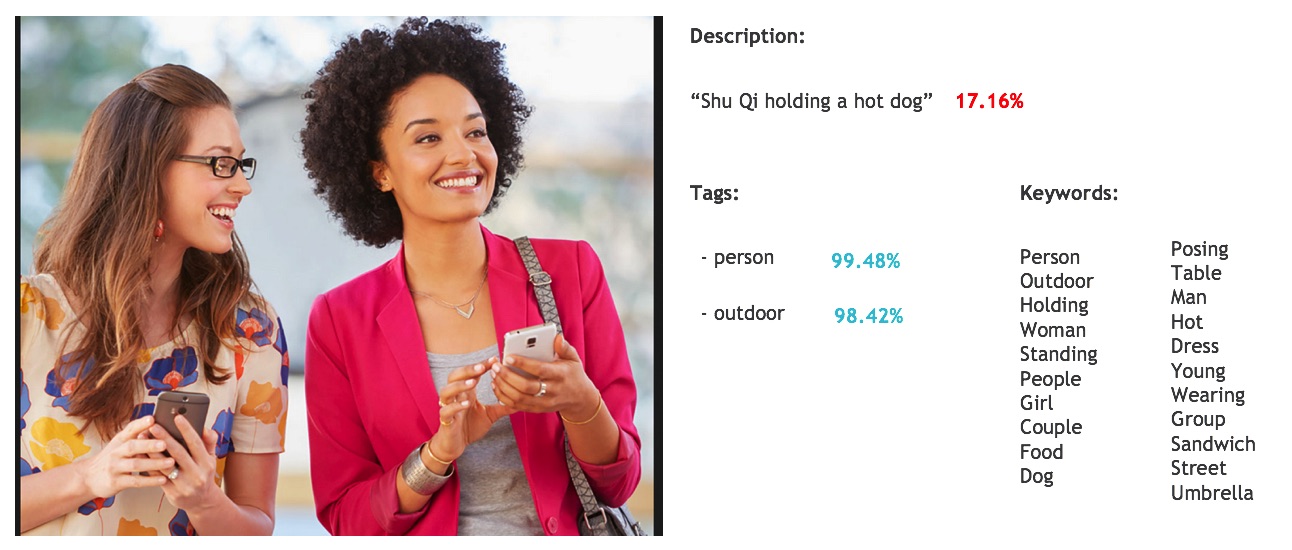
Here are the results for the home page, for example. You probably would want to exclude things that you know are not your keywords (e.g. Search Resutls, Tweets):

1
2
3
4
5
6
7
8
9
10
11
12
13
14
15
16
17
18
19
20
21
The text is 100.0% positive

Sitecore Package
Sitecore MVP
Sitecore Powered
Download Habitat
Github Habitat Repository
Design Package Principles
Simplicity
High Cohesion Domain
Low Coupling
Pentia
Search Results
Anders Laub Christoffersen
Tweets
Extensibility
Flexibility
News List
Latest News
Click
Introduction

Proof Reading

Text Analytics can also tell you how positive your text sounds. positivity is measured in percentage points from 0% to 100%. It’s also just one HTTP request away if you have your text readily available:

1
2
3
4
5
6
7
8
9
$sentiment = Invoke-WebRequest `
-Uri 'https://westus.api.cognitive.microsoft.com/text/analytics/v2.0/sentiment' `
-Body "{'documents': [ { 'language': 'en', 'id': '$($page.ID)', 'text': '$text' } ]}" `
-ContentType "application/json" `
-Headers @{'Ocp-Apim-Subscription-Key' = '<use-your-own-key>'} `
-Method 'Post' `
-UseBasicParsing | ConvertFrom-Json

Write-Host "The text is $($sentiment.documents[0].score*100)% positive"

Many pages in the Habitat demo site are close to 100% positive. That’s to be expected for the elevated marketing speak I guess. A few, however, came back with just 16%. And it turns out that you don’t have to sound too negative to score that low. It’s enough to just be very dry and matter-of-factly. Like this:

1
2
3
4
The accounts module handles user accounts and user profiles including login, registration, forgot password and profile editing. 
A number of components are available to handle login, registration and password reset.
Links to specific pages showing these components are as follows.
Login, Register, Edit Profile (logged in users only), Forgotton Password

Imagine running a script like that for all the pages on your site and sending the results off to your content team? Maybe you will not be able to completely automate keywords generation but you will definitely help them spot content that needs improving.

I have been working with cognitive APIs for a while now and I am still surprised how easy it is to get stuff done. I am even more excited about what’s coming in the near future! So much so that I will be speaking about cognitive APIs and smart apps that one can built with them on the API Strategy conference this coming November. See you in Boston!

Image Tagging Automation with Computer Vision

I have recently presented my explorations of computer vision APIs(part 1, part 2, and part 3) on the AI meetup in Alpharetta. This time I decided to do something useful with it.

Image Tagging

When you work with digital platforms (be that content management, e-commerce, or digital assets) you can’t go far without organizing your images. Tagging makes your assets library navigable and searchable. Descriptions are a great companion to the visual preview and can also serve as the alternate text. WCAG 2.0 requires non-text content to come with a text alternative for the very basic Level A compliance.

Computer Vision

When I played with the trained computer vision models from different vendors, I realized that I can get a good set of tags from either one of the APIs and some would even try to build a description for me. The digital assets management vendors started playing with this idea as well. Adobe, for example, has introduced smart tags in the latest release of AEM. Maybe I can do the same using Computer Vision APIs and integrate with a digital product that doesn’t have that capability built in yet? Let’s try with Sitecore.

Automation

I am going to use Computer Vision from Microsoft Cognitive Services and the Habitat demo site from Sitecore. I am also going to need Powershell Extensions to automate everything.

We will need the URL of the computer vision API, the binary array of the image, the Sitecore item representing the image to record the results on, and a little bit of Powershell magic to glue it all together.

Here’s the crux of the script where I call into the computer vision API:

1
2
3
4
5
6
7
8
9
10
11
$vision = 'https://api.projectoxford.ai/vision/v1.0/analyze'
$features = 'Categories,Tags,Description,Color'

$response = Invoke-WebRequest `
-Uri "$($vision)?visualFeatures=$($features)" `
-Body $bytes `
-ContentType "application/octet-stream" `
-Headers @{'Ocp-Apim-Subscription-Key' = '<use-your-key>'} `
-Method 'Post' `
-ErrorAction Stop `
-UseBasicParsing | ConvertFrom-Json

It’s that simple. The rest of it is using Sitecore APIs to read the image, update the item with tags and descriptions received from the cognitive services, and also a try/catch/retry loop to handle the API’s rate limit (in preview it’s limited to 5000/month and 20/minute). You can find the full script on github.

20/20

Some images were perfectly deciphered by the computer vision API as you can see in this example (the %% are the confidence level reported by the API):

Computer Vision can clearly see what's in the image

Legally Blind

But some others would puzzle the model quite a bit:

Computer Vision mistakes a person for a celebrity and the cell phone for a hot dog

Not only there’s no Shu Qi in the picture above, there’s definitely no hot dog and no other food items. Granted, the API did tell me that it was not really sure about what it could see. Probably a good idea to route images like that through a human workflow for tags and description validation and correction.

Domain Specific Models

The problem with seeing the wrong things or not seeing the right things in a perfectly focused and lit image is … lack of training. Think about it. There are millions and millions of things that your vision can recognize. But you have been training it all your life and the labeled examples keep coming in on a daily basis. It takes a whole lot of labeled images to train a generic computer vision model and it also takes time.

You can get better results with domain specific models like that offered by Clarifai, for example. As of the time of this writing you can subscribe to Wedding, Travel, and Food models.

Domain Specific Computer Vision model from Clarifai

I am sure you’ll get better classification results out of these models than out of a generic computer vision model if your business is in one of these industries.


Next time I will explore Text Analytics API and will show you how it can help tag and generate keywords for your content.

Content Testing and Context.Site

A quick blog post about Content Testing feature of Sitecore and its unfriendliness towards Context.Site

I went through a few content testing scenarios recently and one thing really puzzled me: Content Testing dialogs stumble upon Context.Site.

Reference Storefront

If you try to set up a test in the Sitecore Commerce reference storefront and send the page through the workflow, here’s how the variants screenshots will look like:

Test Variants Screenshots all show YSOD

The base controller is using Context.Site for view path resolution:

1
2
3
4
5
6
7
8
9
10
11
12
13
protected string GetRenderingView(string renderingViewName = null)
{
/*
ShopName is a property on the CommerceStorefront object that is represented
by an item at Context.Site.RootPath + Context.Site.StartItem
*/
var shopName = StorefrontManager.CurrentStorefront.ShopName;
// ...
const string RenderingViewPathFormatString = "~/Views/{0}/{1}/{2}.cshtml";
// ...
return string.Format(RenderingViewPathFormatString, shopName, "Shared", renderingViewName);
}

And it won’t find anything in the shell site:

1
2
3
4
5
6
7
8
9
Nested Exception

Exception: System.InvalidOperationException
Message: The view '~/Views/shell/Shared/Structures/TopStructure.cshtml' or its master was not found or no view engine supports the searched locations. The following locations were searched:
~/Views/shell/Shared/Structures/TopStructure.cshtml
Source: System.Web.Mvc
at System.Web.Mvc.ViewResult.FindView(ControllerContext context)
at System.Web.Mvc.ViewResultBase.ExecuteResult(ControllerContext context)
...

Habitat

Trying the same workflow with test in Habitat stumbles upon the validation step:

Validation shows error 500

Here the Context.Site is being used for custom dictionary functionality:

1
2
3
4
5
6
7
8
9
10
11
12
private Item GetDictionaryRoot(SiteContext site)
{
var dictionaryPath = site.Properties["dictionaryPath"];
if (dictionaryPath == null)
{
throw new ConfigurationErrorsException("No dictionaryPath was specified on the <site> definition.");
}

// ...

return rootItem;
}

And it also errors out in shell:

1
2
3
4
5
6
7
8
9
Nested Exception

Exception: System.Configuration.ConfigurationErrorsException
Message: 'No dictionaryPath was specified on the <site> definition'.
Source: Sitecore.Foundation.Dictionary
at Sitecore.Foundation.Dictionary.Repositories.DictionaryRepository.GetDictionaryRoot(SiteContext site)
at Sitecore.Foundation.Dictionary.Repositories.DictionaryRepository.Get(SiteContext site)
at Sitecore.Foundation.Dictionary.Repositories.DictionaryRepository.get_Current()
...

Just in case you wondered, Preview.ResolveSite doesn’t help.

Conclusion

Alistair Deneys explained that Content Testing needs to run screenshot generation in context of shell to render unpublished content of different versions.

Content Testing needs to quickly learn how to do everything it needs in the context of the current site while getting everything from the master database.

While you probably shouldn’t use Context.Site for view path resolution - we now have official support for MVC areas, and probably shouldn’t use custom dictionary implementation - here’s my blog post on how to make standard dictionary items editable in Experience Editor, you should be allowed to use Context.Site in your page rendering logic if you need it.

Sitecore Catalog Export for Azure Recommendations API

Azure Recommendations API requires a product catalog snapshot and the transactions history to train a model. This blog post will show you how you can export a Sitecore Commerce reference storefront catalog using PowerShell Extensions.

Bare Minimum

Let’s start small. At a minimum, the Recommendations API needs your SKU #s, product name, and the category name:

1
2
3
AAA04294,Office Language Pack Online DwnLd,Office
AAA04303,Minecraft Download Game,Games
C9F00168,Kiruna Flip Cover,Accessories

The following script will give us the data we need:

1
2
3
4
5
6
7
8
9
10
$catalog = '/sitecore/Commerce/Catalog Management/Catalogs/Adventure Works Catalog'
$product = '{225F8638-2611-4841-9B89-19A5440A1DA1}' # Commerce Product Template

$products = Get-ChildItem -Path $catalog -Recurse `
| Where { $_.Template.InnerItem['__Base template'] -like $product }

$products | Select 'Name', `
'__Display Name', `
@{Name = 'Category'; Expression = {$_.Parent.Name}} `
| Sort 'Name' -Unique

The result looks like this:

1
2
3
4
5
6
7
Name        __Display name                   Category
---- -------------- --------
22565422120 Gift Card Departments
AW007-08 Black Diamond Quicksilver II Carabiners
AW009-08 Black Diamond Quicksilver II SaleItems
AW013-08 Petzl Spirit Adventure Works Catalog
...

Adding Features

Features need to be exported in a special format. Different products in a given catalog may have different features and even have different number of them. Azure solves this by requiring features as a comma separated list of name value pairs:

1
2
3
AAA04294,Office Language Pack Online DwnLd,Office,, softwaretype=productivity
BAB04303,Minecraft DwnLd,Games,, softwaretype=gaming, compatibility=iOS, agegroup=all
C9F00168,Kiruna Flip Cover,Accessories,, compatibility=lumia, hardwaretype=mobile

The following addition to the script will add features to the list:

1
2
3
4
5
6
7
8
9
10
11
12
13
14
15
16
17
18
19
20
21
22
23
24
25
26
27
28
29
30
31
32
33
34
35
36
37
38
function ExtractFeatures($product)
{
$fields = $product.Template.OwnFields `
| Where { $_.Name -notlike 'images' -and $_.Name -notlike '*date'} `
| Where { $product[$_.Name] -ne '' }

$features = @()
foreach($field in $fields)
{
$features += @{Name = $field.Name; Value = $product[$field.Name]}
}

return $features
}

function ApplyFeatures($product)
{
foreach($feature in $product.Features)
{
$product | Add-Member -Name $feature.Name `
-MemberType NoteProperty `
-Value "$($feature.Name)=$($feature.Value)"
}

$product.PSObject.Properties.Remove('Features')

return $product
}

# ... (see above)

$products | Select 'Name', `
'__Display Name', `
@{Name = 'Category'; Expression = {$_.Parent.Name}}, `
'Description', `
@{Name = 'Features'; Expression = {ExtractFeatures($_)}} `
| Sort 'Name' -Unique `
| %{ ApplyFeatures $_ }

PSObject is a dynamic type that you can modify on the fly. First, I extracted a collection of features into a new Features property. Then I applied features to become new properties on the product object. CSV export will be able to pick it up transparently. I hope.

CSV

It should now be easy to export the list as CSV. There’s a caveat though.

Both ConvertTo-CSV and Export-CSV will happily export the list for you but will normalize every record to the common set of fields.

You won’t see the features in the list. Here’s a trick to get every product in the export have its own features:

1
2
3
4
5
6
7
8
9
10
# ... (see above)

$products | Select 'Name', `
'__Display Name', `
@{Name = 'Category'; Expression = {$_.Parent.Name}}, `
'Description', `
@{Name = 'Features'; Expression = {ExtractFeatures($_)}} `
| Sort 'Name' -Unique `
| %{ ApplyFeatures $_ } `
| %{ ConvertTo-CSV -InputObject $_ -NoTypeInformation | Select -Skip 1 }

Instead of piping the entire set to the ConvertTo-CSV, I basically processed the list one by one in the foreach loop. I also removed the type info and the CSV headers. Azure doesn’t need labels anyway. Works like a charm!

1
2
3
4
5
"AW007-08","Black Diamond Quicksilver II","Carabiners","Straight","BasePrice=10.0000"
"AW009-08","Black Diamond Quicksilver II","SaleItems","Straight"
"AW013-08","Petzl Spirit","Adventure Works Catalog","Straight"
"AW014-08","Petzl Spirit","Carabiners","Straight","BasePrice=14.0000"
"AW029-03","Women's woven tee","Shirts","Short-sleeve, breathable henley, 100% cotton knit","BasePrice=35.0000","Brand=Litware"

Commas and Quotes

There’s one more thing that I needed to do for Azure Recommendations API to absorb the catalog. As you could tell, the catalog format is not exactly CSV. Every line can have different number of fields basically. Neither does Azure backend use CSV parsing to read it.

The double quotes in the export above were taken literally. Azure would think that the SKU # is "AW007-08", for example. And then the commas in the descriptions where messing up the parsing as well. My next post will be about the Recommendations API itself and I will write more about it, but here’s the final version that produces a clean catalog export ready to go:

1
2
3
4
5
6
7
8
9
10
11
12
13
14
15
16
17
18
19
20
21
22
23
24
25
26
27
28
29
30
31
32
33
34
35
36
37
38
39
function ExtractFeatures($product)
{
# ... (see above)
}

function ApplyFeatures($product)
{
# ... (see above)
}

function CleanUpCommas($product)
{
foreach ($prop in $product.PSObject.Properties)
{
$src = $product.PSObject.Members[$prop.Name].Value
$product.PSObject.Members[$prop.Name].Value = $src -replace ",", ";"
}

return $product
}

function CleanUpQuotes($line)
{
return $line -replace """", ""
}

# ... (see above)

$products | Select 'Name', `
'__Display Name', `
@{Name = 'Category'; Expression = {$_.Parent.Name}}, `
'Description', `
@{Name = 'Features'; Expression = {ExtractFeatures($_)}} `
| Sort 'Name' -Unique `
| %{ ApplyFeatures $_ } `
| %{ CleanUpCommas $_ } `
| %{ ConvertTo-CSV -InputObject $_ -NoTypeInformation | Select -Skip 1 } `
| %{ CleanUpQuotes $_ }

Got to love PowerShell. Cheers!

Azure Sign-Up is Way Too Smart

I was playing with Azure Cognitive Services and figured that I would switch to my @epam.com account for the next prototype. I needed to re-sign-up. This is my story.

Login

Microsoft’s live.com OAuth can integrate with your ADFS for a single sign-on experience:

Microsoft Online OAuth Login

I opted in for my work account, authenticated, and went ahead to enable the services I needed.

Verification

To enable Cognitive Service APIs on this account I needed to activate my Azure subscription. Microsoft will challenge your identity twice.

First, it’s the code verification that you can do by sending yourself a text. My form was pre-populated with the Belarus country code (+375). I quickly dismissed it as probably an old attribute on my AD profile. You see, I lived in Minsk (Belarus) before I moved to the states a good while ago but not every enterprise system got the memo. No big deal. Typed in my cell phone and got the activation code.

Then it’s the identify verification by card:

Identify verification by card

My postal code is again pre-populated with the one from the past. This time, however, I wasn’t able to use my current address:

Postal code is too short

What do you do when an online form tries to outsmart you? I, personally, try to outsmart it back:

1
2
3
4
5
6
7
8
const rules = $('#PCSBodyForm').data('validator').settings.rules;

// -> Object {required: true, minlength: 6, maxlength: 6, pattern: "^[0-9]{6}$"}

rules.billingZipcode.minlength = 5;
rules.billingZipcode.pattern = '^[0-9]{5}$';

// -> Object {required: true, minlength: 5, maxlength: 6, pattern: "^[0-9]{5}$"}

Alright!

Way Too Smart

Guess what, Microsoft engineers are very diligent. The validation also runs server-side and the form comes back with an error:

Your address is invalid

Sigh… My US street address and the city of Marietta were gladly accepted. It’s the postal code format and length validation that failed. Why so serious? A better solution would probably be to ask for a country as part of the address form and validate against it. Or maybe trust the SSO challenge that I went through when logging in and just collect my card?

Anyway. I guess I will keep using my personal account with Azure for now and will wait for out IT to find the field in my profile that ties me to my home country.

Cognitive APIs. Vision. Part 3.

I have used Cognitive Services from Microsoft (part 1) and IBM Watson Services (part 2) to read my avatar image. There are two more APIs that I would like to put to the test - Google Cloud Vision API and Clarifai.

Google Cloud Vision

I already had a developer account. To use the Cloud Vision API I only had to enable it in the console and generate myself a browser key. When you sign up, Google asks for your credit card but they promise not to charge it without your permission. They also give you $300 in free trial credit and 60 days to use it.

The API itself is clearly designed for extensibility.

It’s a single endpoint that can do different things based on your request. An image can either be sent as a binary data or as a URL to a Google Storage Bucket. You can send multiple images at once and every image request can ask for different type of analysis. You can also ask for more than one type of analysis for a given image.

Google can easily add new features without adding new APIs or changing the endpoint’s semantics. Take a look:

1
2
3
4
5
6
7
8
9
10
11
12
13
14
15
16
17
18
19
20
21
22
23
24
25
26
27
28
29
30
const key = '<use-your-own-key>';
const url = `https://vision.googleapis.com/v1/images:annotate?key=${key}`;

fetch(url, {
method: 'POST',
headers: new Headers({
'Content-Type': 'application/json'
}),
body: JSON.stringify({
'requests': [{
'image': {
'source': {
'gcsImageUri': 'gs://pveller/pavelveller.jpeg'
}
},
'features': [{
'type': 'LABEL_DETECTION',
'maxResults': 10
}, {
'type': 'FACE_DETECTION'
}],
}]
})
}).then(function(response) {
return response.json();
}).then(function({ responses }) {
const labels = responses[0].labelAnnotations;

console.log(labels.map((l) => `${l.description} - ${l.score.toPrecision(2)*100}%`))
});

Here’s what I got:

1
2
3
4
5
6
7
8
[ 
"hair - 95%",
"person - 94%",
"athlete - 88%",
"hairstyle - 84%",
"male - 79%",
"sports - 72%"
]

A man who definitely cares about his hair, right? :) I am not sure where the sports and athlete bits came from. I also wonder if I would get more tags (like a microphone, for example) if I could ask for features with lower scores. The API doesn’t seem to allow me to lower the threshold. I asked for ten results but got only six back.

The face detection sent down a very elaborate data structure with coordinates of all the little facial features. Things like left eye, right eye, eyebrows, nose tip, and a whole lot more. The only thing is … you can’t see the left side of my face on my avatar.

Google also tries to detect emotions. Of all that it can see - anger, joy, sorrow, surprise - none came back with anything but VERY_UNLIKELY. You can also test an image for explicit content. Same VERY_UNLIKELY for my avatar.

Very pleasant experience but I honestly expected a little more from Google’s Vision API.

I expected more because I know Google does all kinds of crazy things with deep learning in their labs. With images as of two years go and very recently with video. Maybe as those models mature, the Cloud Vision will support more features? Time will tell.

Clarifai

The easiest setup experience by far!

I was ready to go in just a few seconds, no kidding! And it also felt like the fastest response from all the APIs I tried. Very easy and intuitive to use as well:

1
2
3
4
5
6
7
8
9
10
11
12
13
14
15
16
17
18
19
20
21
22
const key = '<use-your-own-key>';
const url = 'https://api.clarifai.com/v1/tag';

const data = new FormData();
data.append('url', image);
data.append('access_token', key);

fetch(url, {
method: 'POST',
body: data
}).then(function(response) {
return response.json();
}).then(function({ results }) {
const tags = results[0].result.tag;
const labels = [...tags.classes.keys()].map((i) => ({
'class': tags.classes[i],
'confidence': `${tags.probs[i].toPrecision(2)*100}%`
}));

console.log(labels.map((l) => `${l.class} - ${l.confidence}`));
});

Here’s what I got back:

1
2
3
4
5
6
7
8
9
10
11
12
13
14
15
16
17
18
19
20
21
22
[
"music - 100%",
"singer - 99%",
"man - 99%",
"people - 98%",
"competition - 98%",
"musician - 98%",
"one - 98%",
"concert - 98%",
"pop - 97%",
"microphone - 97%",
"portrait - 97%",
"journalist - 96%",
"press conference - 96%",
"wear - 95%",
"administration - 95%",
"television - 94%",
"stage - 94%",
"performance - 93%",
"recreation - 92%",
"festival - 92%"
]

This is actually very close! Good feature detection with various plausible scenarios spelled out based on that. I would only question the absolute confidence in music and singer :) What about a… conference and a speaker?

Clarifai has another very interesting endpoint - Feedback. I haven’t used it but it seems that you can submit your own labels back to Clarifai and help them train and fine-tune the model. It won’t be your own classifier like Watson does. Feedback seems to be a crowdsourcing mechanism to train their main shared model(s). I only wonder how it will work without you having to specify the area of the image that each new label is attached to. In case of my avatar, conference and speaker would attach to the whole image. What about more involved images? Maybe I am missing something…


There’s a lot more computer vision APIs out there. Some are more generic and some a geared towards more specialized tasks like visual product search or logo recognition. Go give it a try!

It’s fascinating what kinds of things are just one HTTP request away.

Cognitive APIs. Vision. Part 2.

In part 1 of this blog series I had Microsoft’s Computer Vision analyze my avatar. Today I would like to ask Mr. Watson from IBM to do the same.

Setup

Same as last time, modern JavaScript and a modern browser.

Getting started with Watson APIs takes a few more steps but it’s still very intuitive. Once you’re all set with Bluemix account, you can provision the service you need and let it see your images.

API

IBM had two vision APIs. AlchemyVision has been recently merged with the Visual Recognition. If you use the original Alchemy endpoint, you will receive the following notice in the JSON response: THIS API FUNCTIONALITY IS DEPRECATED AND HAS BEEN MIGRATED TO WATSON VISUAL RECOGNITION. THIS API WILL BE DISABLED ON MAY 19, 2017.

The new unified API is a little weird. Similar to the computer vision from Microsoft, it can process binary images or can go after an image by its URL. Both need to be submitted as multipart/form-data though. Here’s an exampel from the API reference:

IBM Watson Visual Recognition API

It’s the first HTTP API that I’ve seen where I would be asked to supply JSON parameters as a file upload. You guys? Anyway. Thanks to the Blob object I can emulate multipart file upload directly from JavaScript.

Another puzzling bit is the version parameter. There’s a v3 in the URL but you also need to supply a release date of the version of the API you want to use. Trying without it gives me 400 Bad Request. There’s no version on the service instance that I provisioned so I just rolled with what’s in the API reference. It worked.

I also couldn’t use fetch with this endpoint. This time it’s not on Watson though. My browser would happily send Accept-Encoding with gzip in it and IBM’s nginx would gladly zip up the response. Chrome dev tools can deal with it but fetch apparently can’t. I get SyntaxError: Unexpected end of input at SyntaxError (native) when calling .json() on the response object.

Not sending Accept-Encoding would help but it’s one of the headers you can’t set. I had to resort to good old XHR.

And Here We Go

1
2
3
4
5
6
7
8
9
10
11
12
13
14
15
16
17
18
19
20
21
22
23
24
25
26
27
28
29
// my avatar
const image = 'http://media.licdn.com/mpr/mpr/shrinknp_400_400/p/7/000/22b/22b/32f088c.jpg';

const key = '<use-your-own-key>';
const url = `http://gateway-a.watsonplatform.net/visual-recognition/api/v3/classify?api_key=${key}&version=2016-05-20`;

const parameters = JSON.stringify({
'url': image,
'classifier_ids': ['default'],
'owners': ['IBM'],
'threshold': 0.2
});

const data = new FormData();
data.append('parameters', new Blob([parameters], {'type': 'application/json'}));

const request = new XMLHttpRequest();

request.onload = function () {
const data = JSON.parse(request.response);
const tags = data.images[0].classifiers[0].classes;

const describe = (tag) => `${tag.class}, ${Math.round(tag.score*100)}%`;

console.log(tags.map(describe));
};

request.open('POST', url, true);
request.send(data);

The response from Watson?

Person, 100%

Yep. That’s it. That’s all the built-in classifier could tell me. You can train your own classifier(s) but they all appear to be basic. No feature detection that would allow to describe images. I tried to see all classes in the default classifier but the discovery endpoint returns 404 for default. I guess I will have to check back later ;)


I have more computer vision APIs to try. Stay tuned!

Cognitive APIs. Vision. Part 1.

I’ve been actively looking at machine learning lately. Fascinating applications in day to day live! Often unexpected. Always amazing. More and more accessible every day. Google’s Motion Stills blew me away the other day. Classification of motion vectors and biased estimation models (in a temporal consistent manner, no less) - a lot of science and novel ideas in a free consumer mobile app. Enabled and powered by machine learning.

You have probably noticed a new breed of APIs popping up all over the web. Some simply call it Machine Learning APIs, others call it Cognitive Services, some simply call it Watson. Pre-trained models operationalized with an API layer and APIs to train your own.

This blog post series offers you a short tour of these new machine learning powered APIs. I am going to start with Vision and today I am tasting Microsoft Cogntive Services (aka Project Oxford).

Setup

I am going to use JavaScript and my browser. These are all HTTP APIs so I should be able to just talk to them with very little overhead or ceremonies. Besides, since the intent is to taste (and test) the APIs, I figured I would also take the latest JavaScript and browser APIs for a spin. No transpilation. No polyfills. No external dependencies. Hence a fair warning: the examples are likely to only work in latest evergreen browsers. I am using connect serve-static as my web server (here’s how).

Let’s see how much a computer vision can see in my avatar.

Pavel Veller

Describe

According to the documentation, the Describe endpoint generates a description of an image in human readable language with complete sentences. The description is based on a collection of content tags, which are also returned by the operation.

Getting started is just a few clicks and API reference is very transparent. Here we go:

1
2
3
4
5
6
7
8
9
10
11
12
13
14
15
16
17
18
19
20
21
22
23
24
25
26
const explain = function(what, confidence) {
return `${what} with ${Math.round(confidence*100)}% confidence`;
};

// my avatar
const image = 'http://media.licdn.com/mpr/mpr/shrinknp_400_400/p/7/000/22b/22b/32f088c.jpg';

// Microsoft: Describe
const url = 'https://api.projectoxford.ai/vision/v1.0/describe?maxCandidates=3';
const key = '<use-your-own-key> ';

fetch(url, {
method: 'POST',
headers: new Headers({
'Content-Type': 'application/json',
'Ocp-Apim-Subscription-Key': key
}),
body: JSON.stringify({
'url': image
})
}).then(function(response) {
return response.json();
}).then(function({description: {captions, tags}}) {
console.log(captions.map((c) => explain(c.text, c.confidence)));
console.log(tags);
});

Very straightforward with no surprises. Everything just worked. Here’s what the Describe API sees in my avatar:

A man holding a cell phone (19% confidence)
A man holding a phone (17% confidence)
A young man holding a cell phone (12% confidence)

It definitely sees a man. It’s not sure whether a man is young. It probably doesn’t know what a microphone is but it vaguely remembers that phones used to look like this:

Old Phone

Here are all the tags:

["person", "man", "indoor", "holding", "looking", "cellphone", "hand", "phone", "young", "laptop", "sitting", "standing", "table", "boy", "computer", "shirt", "using", "brush", "red", "blue", "people"]

Tags

Another API endpoint can report tags and also provide the level of confidence in each. I sent the same request to /vision/v1.0/tag and here’s what I got back:

person (100%)
man (95%)
indoor (94%)
microphone (22%)

I wonder why microphone wasn’t detected by the Describe endpoint. I would expect that Describe gets the tags from Tag and then uses language generation algorytms to build the description. Apparently not.

Analyze

One more API endpoint that can process an image from many angles at once. It will report the most likely description and will send down the tags. You can also ask it to detect faces and more. I asked for Description, Tags, and Categories. This one does feel like an aggregation. I got the same set of tags as I got from Tags, same most likely description (with a cell phone) and a longer list of tags as I got from Describe. The category was identified as:

people_young with 81% confidence

Summary

Microsoft Vision API allows you to see one image at a time. You can either upload the binary or point it at a publicly accessible URL. Depending on what you’re after you can get different results. I am still puzzled by the difference in reported tags. It’s capable of working with domain models to do more specialized detection but right now has only one trained - celebrities. I am sure Microsoft will deploy more and will likely let you train your own. I don’t know when but I know that there are other vision APIs that do so.

Next time I will talk to Mr. Watson. Stay tuned!

Do Not Remove Unused Blobs On Save

I have not been actively hands-on with Sitecore lately. But once in a while I come across a question that sounds like a good puzzle to roll up my sleeves for, and then I just can’t help it.

Query

One of our engineers posted a question. Their client’s CM instance was running noticabely slow and the users were complaining. They quicky identified the bottleneck with the SQL profiler but the finding puzzled them:

1
2
3
4
5
6
7
8
9
10
11
12
13
14
15
16
17
18
19
20
21
22
23
24
IF EXISTS (SELECT NULL 
FROM [SharedFields] WITH (NOLOCK)
WHERE [SharedFields].[Value] LIKE @blobId)
BEGIN
SELECT 1
END
ELSE IF EXISTS (SELECT NULL
FROM [VersionedFields] WITH (NOLOCK)
WHERE [VersionedFields].[Value] LIKE @blobId)
BEGIN
SELECT 1
END
ELSE IF EXISTS (SELECT NULL
FROM [ArchivedFields] WITH (NOLOCK)
WHERE [ArchivedFields].[Value] LIKE @blobId)
BEGIN
SELECT 1
END
ELSE IF EXISTS (SELECT NULL
FROM [UnversionedFields] WITH (NOLOCK)
WHERE [UnversionedFields].[Value] LIKE @blobId)
BEGIN
SELECT 1
END

Who Are You

I have once traversed basic item APIs all the way down to data providers and back so I just knew where to look. SqlServerDataProvider in Sitecore.Kernel has a method with a very telling name that runs this query.

The name of the method is - GetCheckIfBlobShouldBeDeletedSql(). Walking up the usages chain I found who runs it:

1
2
3
4
5
6
7
8
9
10
public override bool SaveItem(...)
{
// ...
if (Settings.RemoveUnusedBlobsOnSave)
{
ManagedThreadPool.QueueUserWorkItem((state => this.RemoveOldBlobs(changes, context)));
}
// ...
}

Every item save will call RemoveOldBlobs() that will end up running the mentioned SQL query if RemoveUnusedBlobsOnSave is set to true.

The method runs asynchronously so it doesn’t directly impact the executing thread, but it does put pressure onto the SQL server. Running LIKE logic looking for GUIDs (even without %) in a non-indexed nvarchar field across mutliple tables will take some cycles.

Recommendation

It’s good that this logic is protected with a feature toggle.

I suggested that the team turns off Settings.RemoveUnusedBlobsOnSave and contacts Sitecore Support.

This behavior was observed in 8.1 Update 2. I opened 8.0 Initial Release just out of curiosity and SaveItem() doesn’t go looking for old BLOBs. I didn’t go through more recent releases but it has got to be a relatively new addition. Probably added for a reason.


If we turn off running it on every item save, when should we run it? Maybe it’s missing the ID of the saved item in the WHERE to make it a lot more specific? Don’t know. I will update this post if/when we hear back from the support team.

A Missing Field Type - Part 2

In part 1 of this series I made an argument that Sitecore needs a new field type that would support workflow and versioning without adding language variance. Let’s see why.

Presentation

Presentation details were Shared in older versions of Sitecore . It means no versioning, no workflow support, and no language variance. A page item under workflow will not publish its latest version until the workflow reaches the final state. Too bad for the Shared fields though. Once modified, the change will be picked up by the smart or full publish. A threat is very much real - just like I hope you are using workflows, I also hope that you are using scheduled publishing agents and don’t let your authors work as admins.

Versioned Layouts

Sitecore 8 introduced versioned layouts. Presentation details can now be both Shared and Final and the end result is merged at run time. The promise of versioned layouts is to workflow-enable the presentation details and to also allow language variance. The problem is - you can’t get one without the other.

One Language

I stand corrected. You actually can have workflow support without language variance. Just don’t translate your content. If your site only supports one language, you’ll enjoy using versioned layouts. I would even suggest that you forego the good old __Renderings (Shared layout) altogether to ensure proper versioning and workflow support of your presentation. Rejoice!

Multilingual

There are more than one way to build a multilingual site in Sitecore. Previously, if your layout was the same across languages you could safely translate a single content tree. Now you can do even more with a single content tree thanks to version layouts that can easily accommodate certain language variances. If the content varies significantly and translated sites feel more like distinct online properties, you will probably build parallel content structures but let’s focus on a more common example.

Single content tree. Translated. Under a workflow. Scheduled publishing agents. Best practices. Right?

A change to the Shared portion of the layout is susceptible to the same accidental publishing as the entire layout in older version of Sitecore.

Understood. Can we use final layouts?

A change to the Versioned portion of the layout, while workflow controlled and versioned, only affects a single language.

Wait a minute. Can I or can I not safely and soundly workflow control my layout?

The answer is - it depends. If your presentation details are exactly the same across all translations, then you probably can. You will need language fallback and a little discipline. Language fallback will propagate the value from one language to another provided that the value in another language is null. An empty layout is not null (try resetting it and look at the raw value if you wonder what it is) so there goes the first wrinkle. Any accidental (or not) change to the layout in Experience Editor done not in context of the primary language will break the fallback chain.

Tough. And what if you have a layout variance in a given language?

The Missing Field Type

Well, like I said, Sitecore needs another field type - Workflowed. And I wouldn’t worry about migration issues to be honest. One of the recent updates changed the way clones are handled. A breaking change indeed. Migration instructions included a simple SQL script to upmigrate all clones. Easy, no big deal. Same could be done to legacy __Renderings if field type changed from Shared to a new Workflowed.

Call your congressman.


Something occurred to me while I was writing this small series. There is another best practice that has a very complicated relationship with the workflow. We embrace it and bet our content architectures on it and yet it gets in a way of a smooth and predictable editorial process. Datasorces. Why is it? Can something be done about it?

Next time on this blog. Stay tuned!

p.s. You can also account for language variance in a layout with personalization by language but I would probably advise against it. Assuming, of course, that you are using marketing automation capabilities of Sitecore and specifically the A/B content testing. Algorithms that generate multivariate permutations and track test performance can’t tell the difference between a functional personalization and a marketing-driven experience variance. Hopefully I get to write about it some time later.